Help Center
Documentation
1. Introduction
in.bounz connects all of your company's email inboxes to your Salesforce system and allows you to sort your communications directly in your Salesforce environment. And all this in real time - without any manual effort on your part.
The following documentation gives you detailed information about the app and describes all necessary steps regarding installation and configuration to successfully use in.bounz.
If you need support at any point, please feel free to contact us via email at support@inbounz.com and we will help you immediately.
1.1. Features
in.bounz offers you the following functionalities directly in your own Salesforce environment:
- Overview of the communication in your inboxes
- Automated import of your incoming emails into your Salesforce system
- Create folders in your inbox
- Trigger automatic notifications in Salesforce
- Automatically create and assign tasks in Salesforce based on your communication
- Automatically create and populate records with relevant information from incoming email messages
- Update preconfigured fields, such as the status of an order
All functionalities can be fully automated (depending on preference). Thereby, in.bounz and Salesforce-native automation options seamlessly intertwine.
This list serves as an overview. In the next steps we will describe these functions individually and in detail.
1.2. Interface
The interface for configuring and using in.bounz is composed exclusively of native Salesforce components. You will find the following tabs in the application:
| Tab | Description |
|---|---|
| Home | On the home interface you will find up-to-date dashboards of your emails imported with in.bounz by email address as well as the connected, active and inactive mailboxes. |
| Configurations | With the help of a "Configuration" record created during the configuration, you control the basic settings and rules of the application. |
| Mailboxes | Here you create and manage your monitored mailboxes. |
| Mappings | Here you configure the automated mapping of emails to any Salesforce data structures. |
| Target Objects | Here you configure the automatic creation of data records. |
| Notification Settings | This is where you set up push notifications for one or more Salesforce users. |
| Results | List of most actions performed in the application with respective result and information about occurred errors. |
Note: At least 10 licences of in.bounz are required to use Target Objects.
1.3. Requirements
To be able to install and use in.bounz, some prerequisites must be met in your Salesforce instance. You can find out what these requirements are below.
in.bounz initially requires the use of a Salesforce Platform Edition or Salesforce SalesCloud Enterprise Edition. Higher editions of SalesCloud are of course also supported.
Furthermore, in.bounz requires access to your e-mail provider. It must use IMAP* for this. The app needs to access each user's mailbox, so users must provide their email address and password. To avoid users having to use their private passwords, we strongly recommend using an app password from your email provider.
App passwords allow apps and devices to access your email account when multi-factor authentication is enabled. Your email provider will be able to provide you with all the necessary information. However, it is important to note that not all email providers support this feature. We therefore cannot accept any responsibility for the configuration or restrictions on the part of the provider.
2. Installation and Configuration
To use in.bounz, some preparatory steps are necessary. These include, of course, the installation of the tool itself as well as further configurational measures, which we describe in this chapter.
2.1. Installation
The installation of in.bounz is done via Salesforce AppExchange.
Click the "Get It Now" button to start the installation process.
When you are on the installation page, select "Administrators only". This selection is necessary, otherwise non-authorized users could gain access to sensitive data.
 X
X
Click "Install" and confirm the message "Yes, grant access to these third-party websites".
As part of the installation, release must be granted to address different interfaces. In addition to the interface, communication must also be established with in.bounz servers for the smooth operation of the tool.
Click "Next" to start the installation.
As soon as your installation is finished, you will find all components belonging to the package in your Salesforce-Org. You can recognize them by the name range "in.bounz".
You may see a notification that says, "This application will take some time to install. You will receive an email when the installation is complete." If such a message appears to you for the first time, don't worry. Just click "Done." Salesforce will then email you to let you know if the installation was successful.
 X
X
After the installation is complete, we recommend that you check the installation in the "Packages" section under "Installed Packages" in the Salesforce Setup.
2.2. Granting rights of use
The use of the application requires the assignment of certain rights to desired Salesforce users. A basic distinction is made here according to the type of use:
- in.bounz licenses
- Salesforce permission sets*
in.bounz licenses are assigned in the "Installed packages" area, directly at the in.bounz package listed there. To do this, click on the "Manage licenses" button and assign the desired users.
The assignment of Salesforce permission sets, on the other hand, is done separately. The following types of Salesforce permission sets are basically distinguished in in.bounz:
- in.bounz-Admin: for administrative full access to all areas of the application
- in.bounz-User: for user access to mailbox
To assign these permission sets, search for "permission sets" in Setup.
Search for "in.bounz Admin" and "in.bounz User" in the list and click on the respective set of rights you want to assign to a user.
Go to "Manage assignments" and add the desired users by ticking the checkbox.
IMPORTANT: It is also essential to share the dashboards and reports that come with in.bounz by default. To do this, please go to the standard tabs for "Reports" and "Dashboards" in the Salesforce interface and in each case (!) in the sharing settings of the folder "in.bounz" added with the installation of in.bounz, share it with the group of all internal users. You can find this sharing option as follows: Search using the Reports or Dashboards search function > All Folders > in.bounz > Share (using the arrow function on the right). If this step is missed, the homescreen of the in.bounz app cannot be displayed correctly for users without an administrator license.
2.3. Record Page Activation
Since Salesforce unfortunately does not allow the activation of record pages with simultaneous use of record types when installing applications such as in.bounz, this must be done manually once after installation.
Specifically, this concerns the objects "Mailbox" and "Target Object": You can find these in the setup. Enter Lightning Configuration Pages or Lightning Application Generator in the search bar.
For the object "Mailbox":
For the correct function of in.bounz please assign the page "Other Mailbox Record Page" to the record type "Other" and the page "Outlook Mailbox Record Type" to the record type "Outlook".
You can do the assignment as follows: Click Page > Show > Activation > Assign to Applications, Record Type and Profiles > select in.bounz > Next > Desktop and Phone > Next > Other or click Outlook > Next > Select All Profiles > Save.
For the object "Target Object":
For the correct function of in.bounz please assign the page "Mailbox Target Object Layout" to the record type "Mailbox" and the page "Mapping Target Object Layout" to the record type "Mapping".
You can do the assignment in detail as follows: Click Page > Show > Activation > Assign to Applications, Record Type and Profiles > Select in.bounz > Next > Desktop and Phone > Next > Click Mailbox or Mapping > Next > Select All Profiles > Save.
2.4. Creating the Configuration Record
The first step in configuring the application is to edit the configuration record supplied.
To do this, look for the "in.bounz" application in the App Launcher* or via search function.
Switch to the "Configuration" tab required for this step. Here you have to enter the basic configuration parameters once in the record.
 X
X
The following fields can be configured:
| Field | Mandatory | Description |
|---|---|---|
| Deactivated | Optional | Should not be checked by default. This setting can be used to completely disable in.bounz. |
| Error Email Address | Optional | This field can be used to specify an email address to which notifications will be sent in case of an error. |
| Frequency | Mandatory | This setting determines the frequency with which in.bounz imports emails into the system. The specification must be made in minutes, 1 means every minute, 15 means every quarter of an hour. By default, a frequency of 5 minutes is preset. |
| Debug Mode | Optional | This setting is used for extended playout of communication details between Salesforce and the in.bounz interface. CAUTION: we recommend that you only enable this setting after consulting in.bounz support, as it may make sensitive access and/or transaction data visible to other system administrators. |
| Request Limit | Optional | This setting defines the maximum number of API requests that in.bounz uses daily (within the last 24 hours). in.bounz remains active until the specified daily limit is reached. By default, a request limit of 8000 is preset. |
| Daily Requests | Formular Field* | This field shows the total number of API requests made by in.bounz in the last 24 hours. Thus, the field is mainly used for verification purposes. |
Some notes on the fields:
The "Deactivated" checkbox allows you to manually stop all functions of in.bounz, such as record creation.
The "Reset Configuration" button resets the configuration to its original state and deletes all results data. For more information, see 2.8 Reset the configuration.
2.5. Trial Version
You have the opportunity to test in.bounz for 30 days free of charge and in full. You do not need any credit card information. After 30 days, the trial expires automatically and you can no longer access in.bounz.
If you want to test in.bounz in a sandbox, the installation process works exactly like in the live environment. The only exception is if the sandbox is created after installing in.bounz, i.e. if in.bounz is already pre-installed in the sandbox with partially existing configuration data. In that case, it is mandatory to use the "Reset Configuration" button for smooth operation.
2.6. Order licenses
After you have created the configuration record, you need to complete the purchase process.
This step is especially important so that you can use in.bounz!
The license fees for the use of in.bounz will be collected by direct debit from the account you specified. That is how you can deposit your corresponding information:
1. In the in.bounz app, you will find the "Manage Licenses" button in the "Configuration" tab. Clicking on the button opens a login page to your license management area. In this customer portal you will find all important information about your in.bounz licenses, payment information, but also the possibility to add more licenses with a click.
To log in, you will receive an individual code by email, which you enter in the login page.
2. After logging in, the overview page will open with some information about what you need to tell us in order to use in.bounz in the future.
By clicking on "Check your billing address" you can enter a valid billing address. Then click on "Check your SEPA direct debit mandate" to issue a valid SEPA direct debit mandate. You can also find the input masks for your data below in the tabs "Billing" and "Payment".
After you have entered and saved the necessary data, you will receive an email confirmation and a document with all information about your SEPA direct debit mandate.
Note: The confirmation email will be sent to the email address that was entered during the in.bounz download in the Salesforce AppExchange!
 X
X
2.7. Authentication
Once the record is created and you have deposited your payment information, you need to authenticate with the in.bounz servers to ensure all available functionalities.
This authentication is done once. To do this, simply click on the "Authenticate" button in the created record.
After successful authentication (which may have to be finalized by confirming the OAuth2 query), the user is forwarded to a results page. If successful, the authentication is indicated by a check mark in the "Authenticated" field.
In case of successful authentication, the following message also appears:
 X
X
The check mark under "Authenticated" is then also set in the configuration record.
 X
X
Note: For advanced security, we strongly recommend enabling Login IP Ranges for the integration user's profile (the user who is authenticating). This restricts access to this user from our server only. The IP address ranges to be defined are:
- IP Start & End Address: 92.205.105.248
- IP Start & End Address: 2a00:1169:11d:7b40::
2.8. Reset the Configuration
You can reset in.bounz by clicking on the "Reset Configuration" button in the upper right corner on the level of the configuration record. All results data will be deleted.
In addition, the authentication has to be done again.
The checkbox "Deactivated" allows you to manually stop all functions of in.bounz, such as the creation of records.
3. Operational Use of in.bounz
In this chapter, we describe how you can get the most out of in.bounz. This also requires minor configurations, which - like the configurations already done - only need to be performed once.
We show you the settings with some use cases to make the configuration more clear. Of course, you can configure and use in.bounz for your own individual use case and with your own custom objects.
Prior to the operational use, some information regarding the processing of Emails in in.bounz:
- Batch processing: The e-mails are processed in batches. Each batch contains a maximum of 100 e-mails to ensure optimal processing speed.
- Processing time: It can take up to 20 seconds to check a single email. A new batch will only be processed once the previous one is fully completed.
- Processing order: Emails are checked in chronological order. This means that the oldest emails are processed first.
- One-time processing: Each email is only checked once. Emails that have already been processed will not be checked again to avoid duplicate processing.
3.1. Adding a Mailbox
To import emails, you need a connection to an email mailbox from which in.bounz will import the emails into your Salesforce instance. Before you create a mailbox, it is important to ensure that the record types for the Lightning record pages “Other Mailbox Record Page” and “Outlook Mailbox Record Page” are activated (see section 2.3 Record Page Activation).
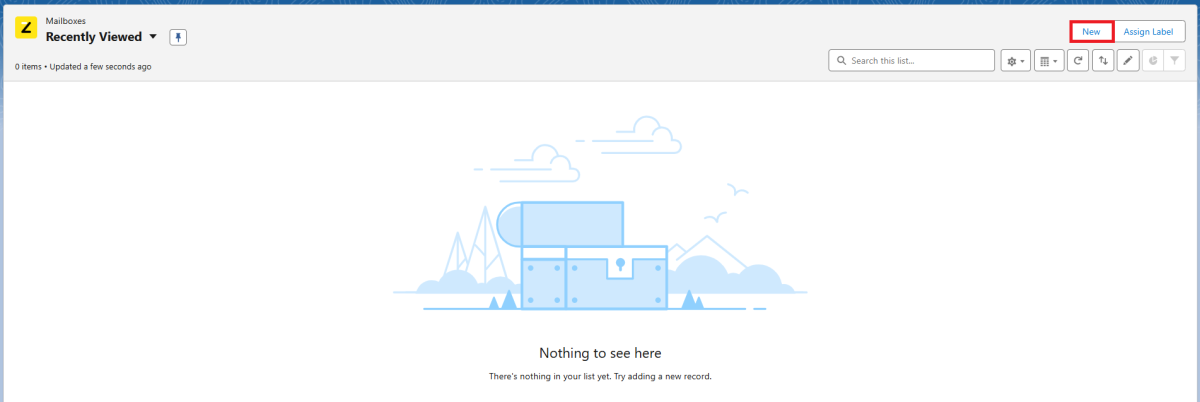
To add a mailbox, click on “New” in the Mailboxes area:
 X
X
Now select the type of mailbox you want to connect (Gmail, Outlook, or Other) and click “Next.” A screen will open where you can fill in the following fields:
| Field | Mandatory | Description |
|---|---|---|
| Name | Mandatory | Enter the desired name for the mailbox here. |
| Email Address | Mandatory | Enter the email address for the mailbox here. |
| User | Mandatory | Here you can define to which user the imported emails should be assigned. |
| Import Start | Optional | Here you can specify the date from which emails from this email address should be imported. |
| Archive After Import | Optional | Here you can specify whether emails should be archived after the import in Salesforce. |
| Allow Multiple Actions | Optional | Here you can define whether multiple actions may be performed after import. If this box is not checked, no further actions will be performed after the first successful mapping (further mappings to objects or creation of records). |
| Attachment Types | Optional | Here you can define which types of files should be considered as attachments by in.bounz. To select a file format, mark the format by clicking on it and then click on the arrow to move it. |
If you selected “Other” as the mailbox type, you must also define IMAP settings. The following additional mandatory fields are available for this purpose:
| Field | Description |
|---|---|
| IMAP Server | Here you specify the Address of the IMAP Server. |
| IMAP User | Here you specify the user who is communicating with the IMAP Server. |
Once you have made all the desired configurations, click on “Save” to create the mailbox.
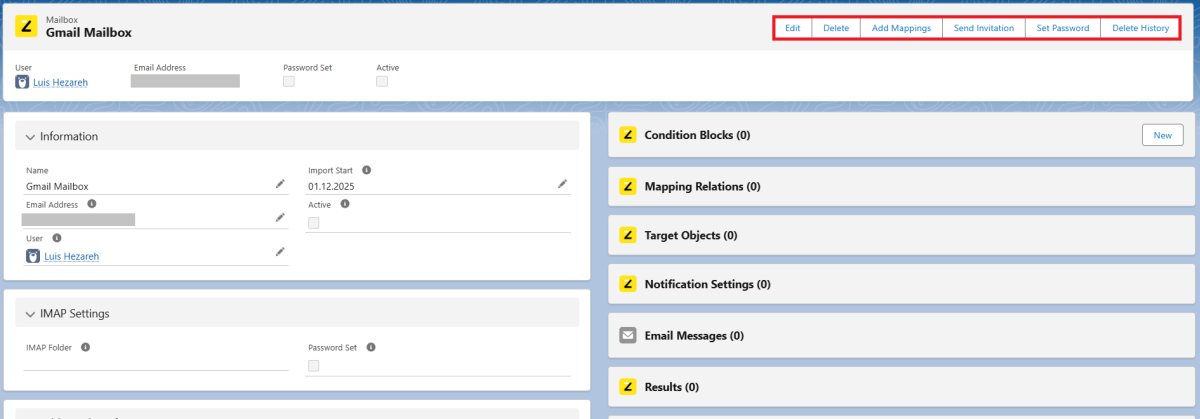
You will now be taken directly to the interface of the newly created mailbox. Here you will find a few more configuration options in the top bar:
 X
X
At this stage, the “Send Invitation” and “Set Password” buttons are particularly interesting.
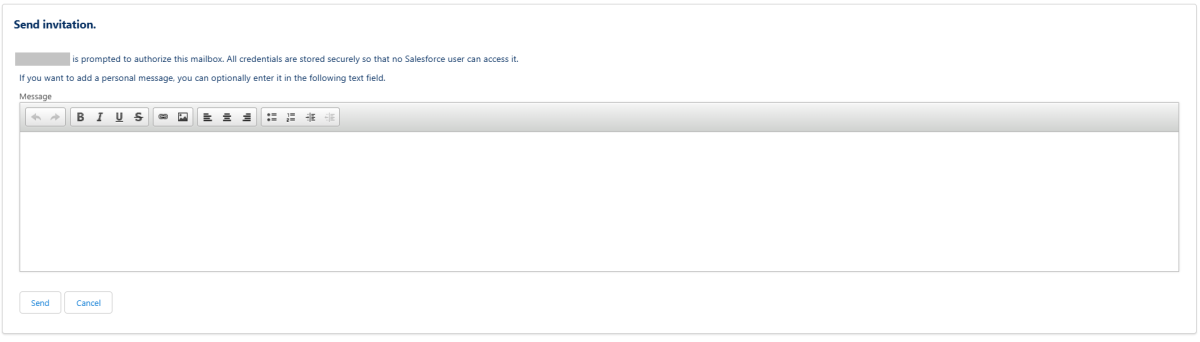
Use the “Send Invitation” button to send an email to the user specified in the "User" or “IMAP User” field, inviting them to enter a mailbox password to use in.bounz for their mailbox. The password is stored securely so that no other Salesforce user can access it. You can also add a personal message to the email.
 X
X
We recommend generating an app password via your email provider's settings and using it to set up the connection. This app password can be stored securely via the “Set Password” button in in.bounz so that no other user has access to it. Using your regular email password is possible, but not the best solution for security reasons.
After you have set your password, the checkbox “Password Set” will now be checked. In addition, several new buttons will appear in the top bar:
 X
X
Under “Set Folder,” you can now define which folder in your mailbox in.bounz should import and process emails from.
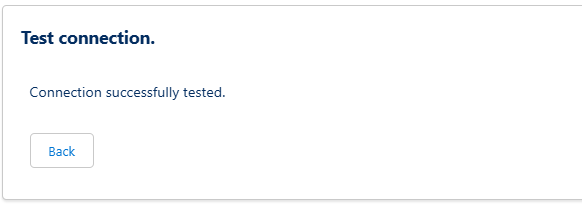
Once you have specified the folder, you can test the connection to your mailbox by clicking “Test Connection”. If everything is configured correctly, the following message will appear:
 X
X
Note: If in.bounz unsuccessfully tries to connect to the deposited program three times in a row, the mailbox will be disabled and a corresponding error message will be sent to the administrator.
The mailbox can now be activated via “Activate.” If you do not see an "Activate" button, this may be due to a lack of permission assignment: Only users with the “in.bounz Admin User” permission set can activate mailboxes.
Note on mapping outbound emails
If you want to use in.bounz to import your outgoing emails from your mailbox into Salesforce, you can do this by working with your email provider's filter settings. To do this, create a folder into which you automatically copy or move the sent emails that you want to import into Salesforce using the filter settings. Then set up a mailbox to monitor that folder ("IMAP Folder" field).
3.2. Import Conditions
If you do not want to import all available emails, but only a certain selection, or if you want to exclude certain emails from import on principle (for example, emails from a certain sender), you can set this up via special "Import Condition" records at the level of the respective "Mailbox" record, i.e. at the level of the mailbox.
Conditions can be set for the following fields and options of the email:
Sender and Recipient as well as CC addresses, Subject, Body and whether an attachment is included.
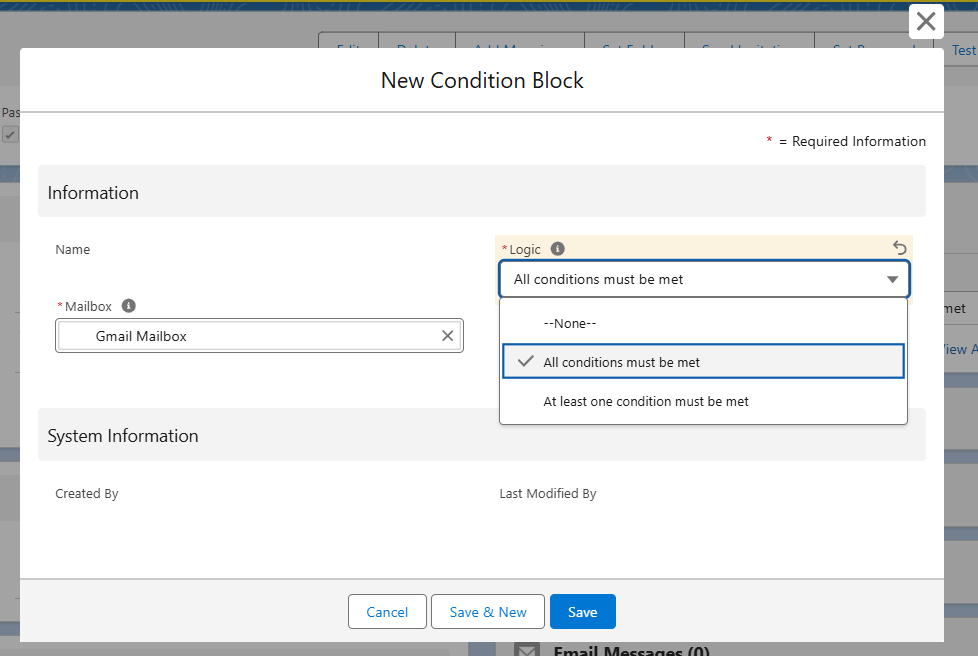
To do this, you must first create a new “Condition Block.” To do so, click on ‘New’ in the “Condition Blocks” area. A window will open in which you must define the “Logic” defining when a condition block is fulfilled. You can choose between “All conditions must be met,” which means that every condition must be fulfilled for an import to take place, or “At least one condition must be met,” which means that one fulfilled condition is sufficient for an import to take place. Then click on “Save” to save the new condition block.
 X
X
Now you can click on the "New" button in the associated "Condition Blocks" list at the level of a "Mailbox" record and create a new "Import Condition" record.
The configuration is done by filling in the required fields:
| Field | Mandatory | Description |
|---|---|---|
| Name | Mandatory | Own, freely selectable name of the rule. |
| Condition Block | Mandatory | Reference to the condition block record associated with the rule. |
| Field Name | Mandatory | Information component of the email to be filtered by. Available are "From Address, To Address, CC Address, Subject, Body, Has Attachment". |
| Operator | Mandatory | Deductive relational operator that must be satisfied. |
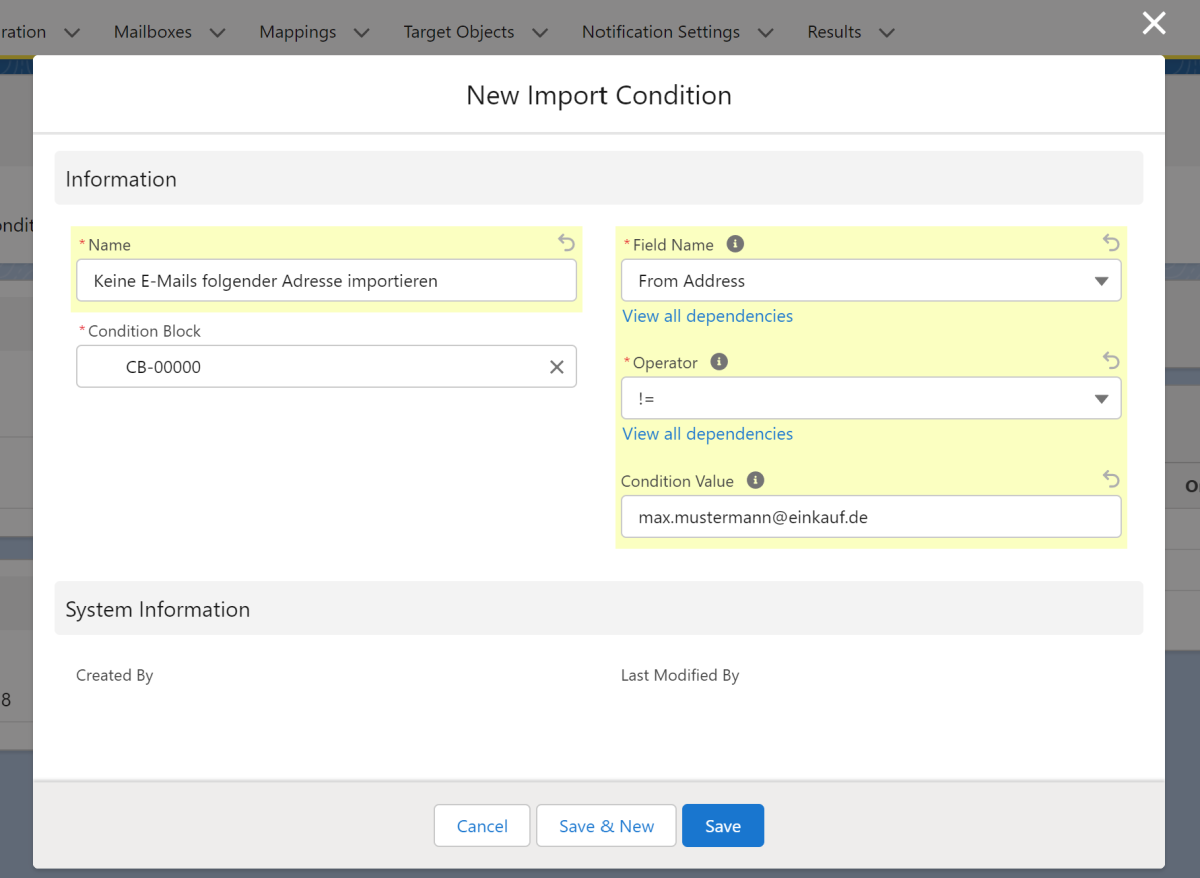
| Condition Value | Optional | Value to be filtered by. |
Note on Condition Value
The "Condition Value" field is a free text field to ensure maximum flexibility. This requires special care when defining the filter value, the possibility of configuration errors is correspondingly high. Therefore, please be sure to follow the instructions in the field's information area. Date, time and decimal values must be formatted correctly. For a comparison with an empty field, the "Condition Value" field should also be left empty.
- Address comparison with operator
=(equal) or!=(unequal) (pay attention to correct notation!) - Address comparison with operator
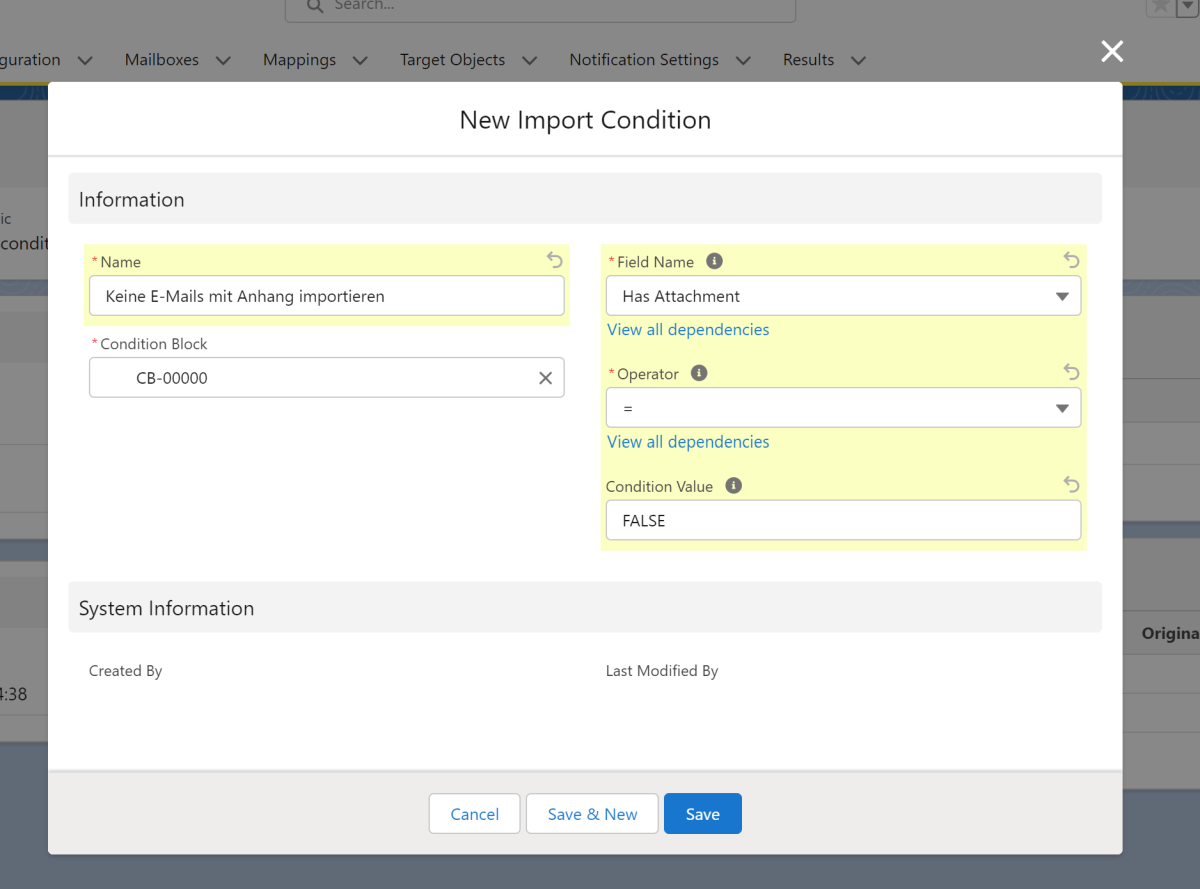
Contains(contains) orNot Contains(not contains) (pay attention to valid and common values!) - Attachment matching in sample
TRUE(applies) orFALSE(does not apply). - Dates in the format
yyyy-mm-dd, e.g.2022-10-09
For examples, feel free to check out the screenshots below:
 X
X
 X
X
3.3. Mapping of incoming emails
in.bounz has the option of automatically assigning imported emails to any Salesforce data structures. This is done via so-called "mappings". This makes sense, for example, if incoming emails in the mailboxes are to be automatically assigned to customer data records.
The assignment of incoming emails to any data records follows the pattern that email components (sender, recipient, CC address, subject, body) are matched with information in Salesforce and, if the search is successful, can be assigned in the system via individually configurable assignment data records ("mappings").
To add a "Mapping" record, click on the "New" button in the "Mapping" records section in the top right corner.
Creating "Mapping" records
An interface for creating a "Mapping" data set opens. Fill in the following fields for the configuration:
| Field | Mandatory | Description |
|---|---|---|
| Name | Mandatory | Own, freely selectable designation of the assignment rule. |
| Order | Optional | The desired rule priority. This determines the order in which configured assignment rules are executed. |
| Search Object Name | Mandatory | The API name of the object (Custom or Standard) that will be matched with imported emails. |
| Search Field Name | Mandatory | The API name of the field that will be matched with the "Purpose" field of imported emails. |
| Search Scope | Mandatory | Defines which part of the email should be searched. |
| Allow Multiple Hits | Optional | Defines whether multiple search hits are allowed or not. |
| Append E-Mail | Optional | Defines whether the received e-mail should be assigned to the mapping search object or not. |
| Append Attachements | Optional | Defines whether attachments of the received email should be mapped to the Mapping Search Object or not. |
| Case Insensitivity | Optional | Defines whether in.bounz treats uppercase and lowercase letters as distinct or equivalent. By default (not checked), uppercase and lowercase letters are treated as distinct. |
The following screenshot shows an example mapping record for configuring a match with the name of the accounts located in the system:
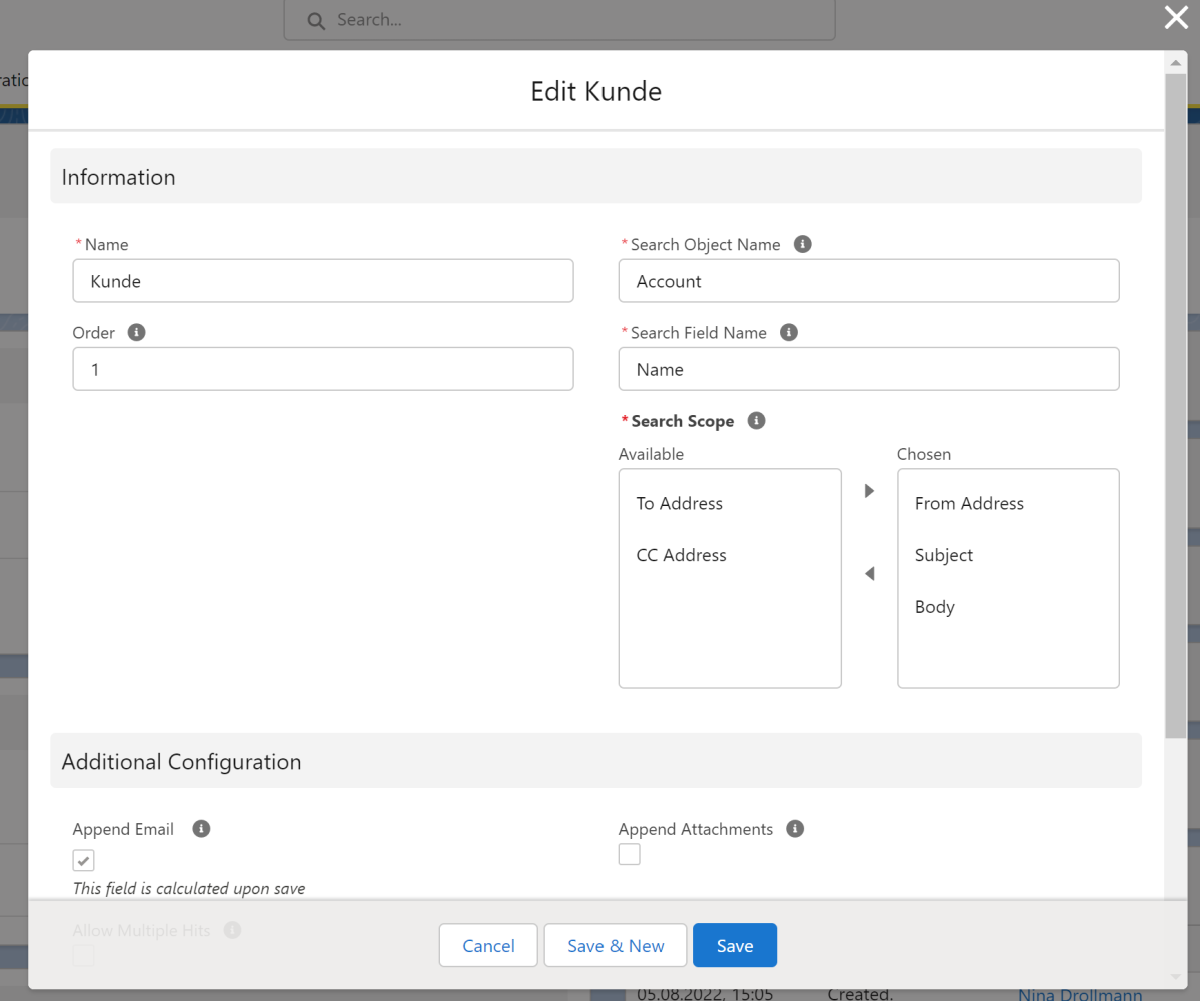 X
X
Note on mappings
We recommend sending all emails from Salesforce with an identifier that you want to track (see example below). To do this, add a merge field to each email signature that contains a corresponding identifier. We recommend the Salesforce ID. If there is a reply to the corresponding email, in.bounz will recognize the ID again. If you use Salesforce standard emails, you don't need to add an identifier of the records you are sending emails from, because Salesforce already stores it (example: WhoID for "Contact" or "Lead"). If you want to track a reference or identifier that is not available by default in Salesforce, you need to make sure you configure your email template accordingly.
Example of assigning an email based on the account ID:
 X
X
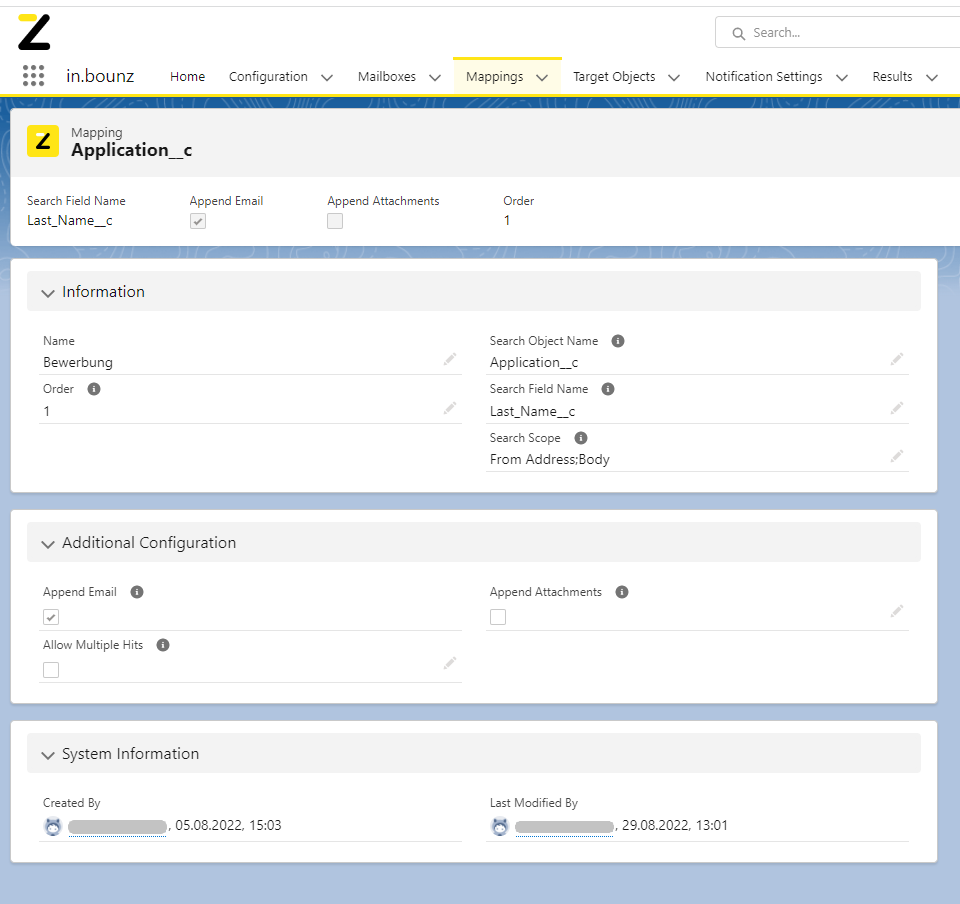
Now it is necessary to define concrete criteria for matching incoming emails.
These determine the conditions under which they are precisely assigned to data records found in the system. For example, an application is to be assigned at the level of the application record on the basis of the last name and matched with the status of the application. For example, this would be interesting if an email is only to be assigned to the application while it is still in "New" status. In the event that, for example, a person then applies for various jobs over time, the email is always assigned only to the application in the current application process.
The respective mapping record could then look as follows:
 X
X
The mapping record for the application object compares whether an application with the last name is stored accordingly in the email address of the sender (From Address) or in the email text (Body).
Mapping Conditions
Mapping conditions allow us to specify exactly when a mapping is executed. Unlike import conditions, which only specify which emails should be imported to your Salesforce Organisation, mapping conditions define whether the operations specified in the mapping should be applied to the email (= whether the mapping should be executed).
To create a mapping condition, click on “New” in the “Mapping Conditions” section and fill in the following fields:
| Field | Mandatory | Description |
|---|---|---|
| Name | Mandatory | Own, freely selectable name of the assignment rule. |
| Mapping | Mandatory | Reference to the associated "mapping" record. |
| Field Name | Mandatory | API name of the field at the "Search Object" level (for example, the invoice) for which specific conditions are to be matched. |
| Operator | Mandatory | Comparison operator to be used for matching. |
| Condition Value | Optional | Value to be filtered by. Please observe the notes on the field of the same name at the level of the "Import Condition" data set! These are also equally valid here. |
Please note the following formatting requirements when storing values in the "Condition Value" field:
- Dates in the format
yyyy-mm-dd, e.g.2022-07-09 - Time specifications in the format
yyyy-mm-dd hh:mm:ss, e.g.2022-07-09 17:36:00 - Decimal values in the format
0.0, i.e. with dot as separator, e.g.10.5
The following screenshot shows the exemplary configuration of a "Mapping Condition" record for matching the "Status__c" field:
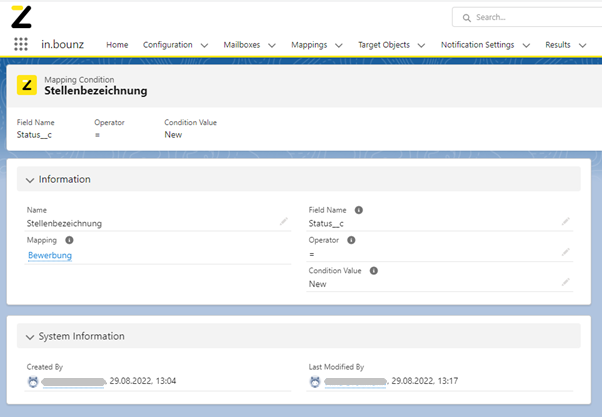 X
X
Creating "Field Updates"
"Field Updates" allow field changes or updates to be made on the records to which the emails are mapped via the "Mapping" record. To create a field update, click on "New" in the "Field Updates" section and fill in the following fields:
| Field | Mandatory | Description |
|---|---|---|
| Name | Mandatory | Own, freely selectable name of the assignment rule. |
| Mapping | Mandatory | Reference to the associated "mapping" record. |
| Field Name | Mandatory | API name of the field at the "Search Object" level (for example, the invoice) for which specific conditions are to be matched. |
| Operator | Optional | Comparison operator to be used for matching. |
| Condition Value | Optional | Value to be filtered by. Please observe the notes on the field of the same name at the level of the "Import Condition" data set! These are also equally valid here. |
| New Value | Optional | New value of the field after email assignment. Please observe the notes on the "Condition Value" field at the "Import Condition" record level! These are also equally valid here. |
An illustrative example: When a response is received from the customer via email to a proposal sent from the Salesforce system with stage value "Proposal/Price Quote", the opportunity stage is automatically set to "Negotiation/Review". This means that everyone knows the current status at all times.
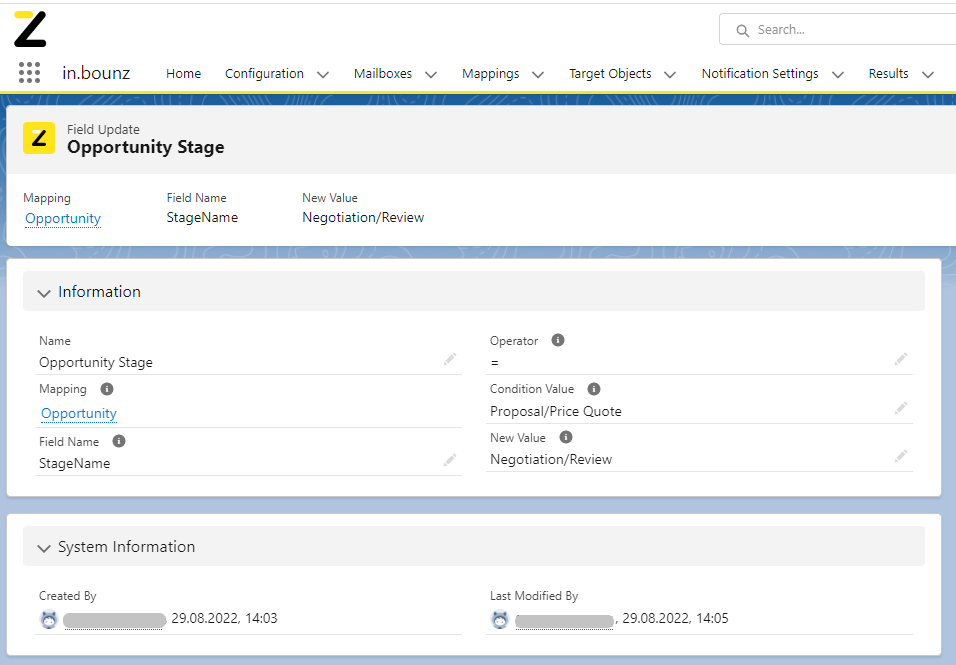 X
X
Note: You can also create field updates without a condition. To do this, simply leave the “Operator” and “Condition Value” fields blank. This will cause the field update to be executed without restriction every time the mapping is executed.
3.4. Target Objects
To configure a "Target Object" record, click the "New" button in the "Target Object" list in the "Target Object Tab".
Now select the type of "Target Object" record. There are the following options:
- "Mailbox": for filling fields of the target record based on fields of the received e-mail.
- "Mapping": for filling fields of the target record based on mappings.
Note on assigning page views
Please make sure that the step "2.3 Record Page Activation" in this documentation has been done before you create "Target Object" records.
To configure a new "Target Object" fill in the following fields:
| Field | Mandatory | Description |
|---|---|---|
| Name | Mandatory | A freely assignable name for this record. |
| Object Name | Mandatory | The API name of the mapping object to create. |
| Mailbox/Mapping | Mandatory | Reference to the associated mailbox/mapping. |
| Append E-Mail | Optional | Defines whether the received email should be assigned to the created "Target Object" or not. Can only be edited manually if the "Target Object" is assigned to a mapping. |
| Append Attachements | Optional | Defines whether attachments of the received email should be assigned to the created "Target Object" or not. |
The creation of at least one "Field Configuration" record subordinate to the "Target Object" is also required for the configuration. These are used to configure the fields of the target data set to be filled by in.bounz.
You create them via the "New" button in the child "Field Configuration" list in the "Target Object".
To configure a new "Field Configuration" record, fill in the following fields:
| Field | Mandatory | Description |
|---|---|---|
| Name | Mandatory | Own, freely selectable designation of the assignment rule. |
| Target Object | Mandatory | Reference to the associated "Target Object" record. |
| Source Type | Mandatory | Defines via dropdown from which matched record data should be transferred to the target record. The field picklist value "Search Object" is not valid for target objects of the type "Mailbox". |
| Source Value | Mandatory | Defines the value to be copied to the target field of the target record. The value can be configured according to the selection made in the Source Type field. |
| Target Field Name | Mandatory | Specifies the API name of the field at the level of the target record into which the data of the source field is to be transferred. |
Depending on the selection of the type of "Target Object" record, either "Source Type" are available in the interface or not.
The following screenshot shows the exemplary configuration of a "Field Configuration" record for the transfer of the "Email" field of the received email into the "Email" field of the "Application" record to be created:
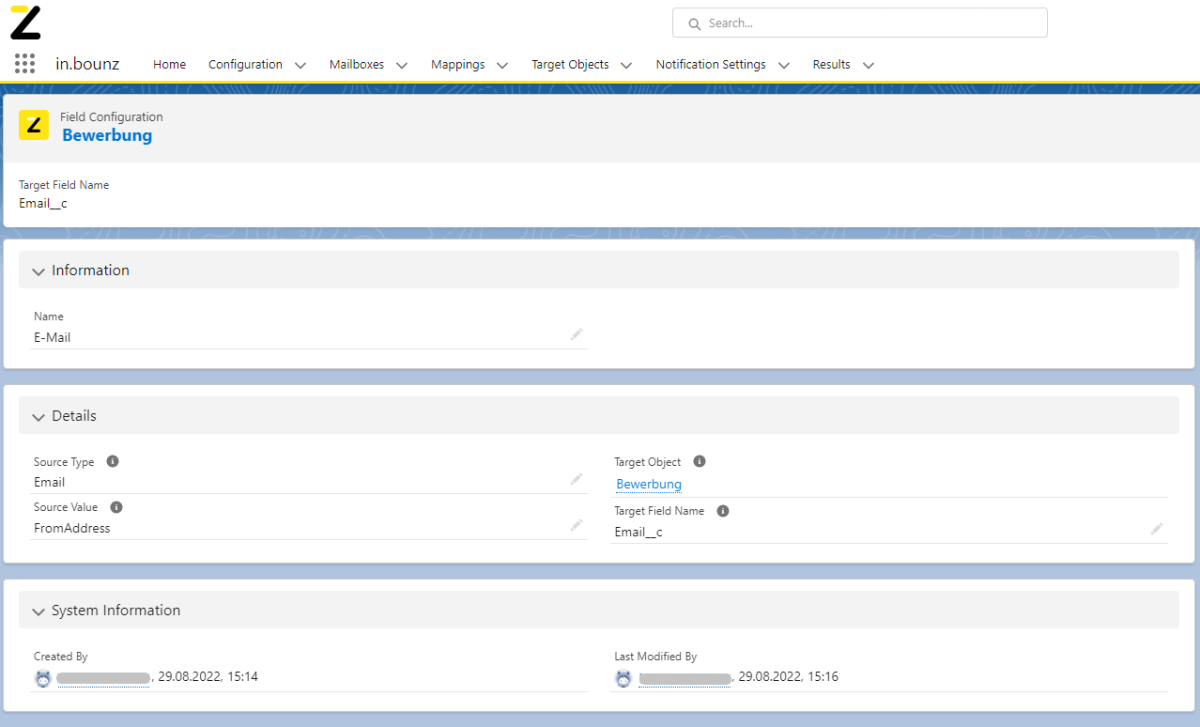 X
X
In our example, we also create additional "Field Configuration" records to take over the "Status" and "Date" field. Newly created "Field Configuration" records appear in the corresponding list at the level of the "Target Object" record:
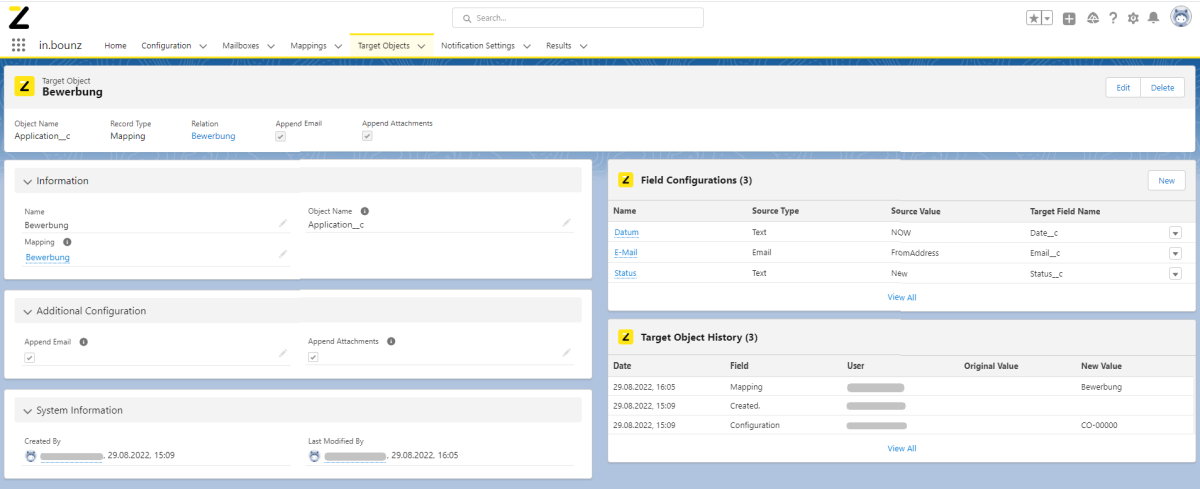 X
X
Note on filling the "Source Value" field
The "Source Value" field is a free text field to ensure maximum flexibility. This requires special care when defining the value, the possibility of configuration errors is correspondingly high. Therefore, please be sure to follow the notes in the information area of the field. Date, time and decimal values must be formatted correctly.
Please note the following formatting requirements when storing values in the "Source Value" field:
- Date information in format
yyyy-mm-dd, e.g.2022-07-09 - Time information in format
yyyy-mm-dd hh:mm:ss, e.g.2022-07-09 17:36:00 - Decimal values in format
0.0, with dot as separator, e.g.10.5 - Information from the Email can be referenced by FromAddress, ToAddress, CCAddress, Subject and Body.
- Information from the Search Object can be referenced by the corresponding API field name.
3.5. Mapping of outgoing emails
in.bounz has the option to automatically assign imported emails to any Salesforce data structure (see note under 3.1 Adding a mailbox). This is possible by working with filter settings of your email provider. For this, all your sent emails have to be copied or moved into a folder that is monitored by in.bounz. This way they can also be logged in Salesforce. We recommend mapping the email address to the corresponding Salesforce contact object.
3.6. Notification Settings
Push notifications for one or more Salesforce users can be set up via "Notification Settings". Push notifications are generated in the following cases:
- If the assignment of incoming e-mail messages is successful.
- In the case of automated generation of "target records".
In addition, a distinction can be made between mailbox and mapping.
To set up push notifications, click the "Notification Setting" tab and then the "New" button in the "Notification Settings" list to create a new "Notification Setting" record. Select whether the notification should be sent when an incoming email is sent to the monitored mailbox ("Mailbox") or when a mapping rule ("Mapping Condition") is successfully fulfilled.
The configuration is done by filling in the following fields:
| Field | Mandatory | Description |
|---|---|---|
| Mailbox | Mandatory | Reference to the "Mailbox" record. |
| User | Mandatory | The Salesforce user to be notified. |
| Active | Optional | The status of the notification setting. If this checkbox is disabled, no notifications will be sent to the corresponding user despite the "Notification Setting" record. |
| Items | Mandatory | Defines for which operations notifications are sent. "Email Message" triggers a notification for an incoming email, "Target Record" triggers a notification for the creation of a new record. |
 X
X
Note on enabling push notifications for mobile devices
To enable push notifications for mobile devices, the notification type "in.bounz Notification" must be edited in the Salesforce setup in the menu item "Notification Delivery Settings" and the respective app to be supported must be selected there under "Applications".
3.7. Testing the email import
To test the email import process as efficiently and easily as possible, you can use the “Import Emails” button. This allows you to manually import a specific number of messages from your mailbox. The emails are not processed immediately, which means that this feature allows you to import the same emails multiple times.
To start the manual import, click “Import Emails” in the top bar.
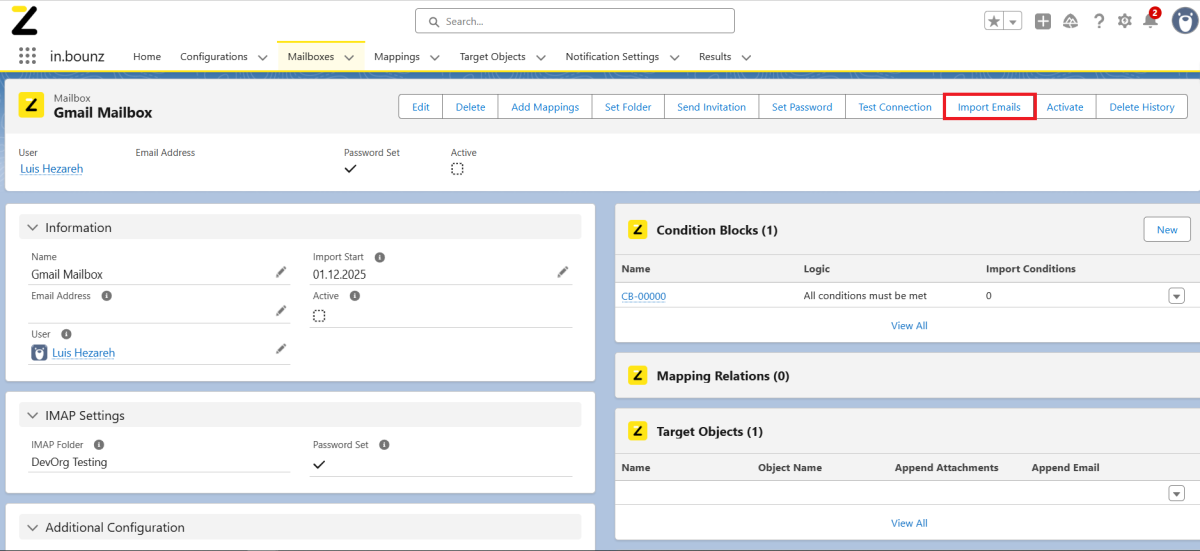 X
X
Now specify the number of emails you want to import, and click “Import.” Once the import is complete, you'll see an overview of successful, failed, and unmapped messages.
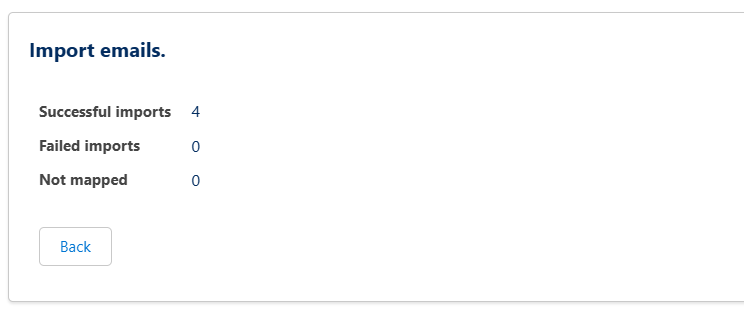 X
X
Note: If there are active mappings connected to your mailbox, an email imported via the Import button will be mapped only once, even if it is imported multiple times.
4. Reporting
With this feature of in.bounz you can monitor all mailboxes and filter them according to any parameters in reports and visually display them in dashboards.
Use the well-known integrated Salesforce tools "Reports" and "Dashboards" for this.
The following "Report Types" are available with in.bounz installation:
| Type | Description |
|---|---|
| Mailboxes | Enables general reports on mailboxes. |
| Mailboxes with Email Messages | Enables reports on mailboxes and emails that have been received. |
Dashboards can also be created from all the reports created using the familiar Salesforce tools.
5. Error Handling
The more diverse the functionality of a system, the more complex the configuration. Errors happen in the process. A central focus of in.bounz is to support users in analyzing configuration errors as best as possible and to avoid input errors directly.
However, if you encounter an unknown error message, simply send a screenshot to support@inbounz.com and we will help you.
5.1. Data entry error
In the event of errors due to incorrect entries or connection problems, the user receives a corresponding message.
If no error message is displayed, it can be assumed that the triggered action was successful.
Displayed error messages may originate from connected third-party systems (e.g. IMAP server), the in.bounz application (e.g. through validations during data entry) or Salesforce itself.
If an error message is unclear, we recommend to consult the Salesforce administrator responsible for the installation.
5.2. Error with actions performed in the background
For a better overview, a large part of the actions performed in the background (for example, the import of emails) is stored in a "Result" object set up for this purpose. This enables the traceability of actions performed in the background or automatically.
A list of these result records can be found in the "Results" tab. In case of success, the message "Success" is displayed. In case of error, the corresponding error.
Note on the release of storage space
To free up memory that has been consumed over time by accumulated "Result" records, the "Clear" button can be used in any list view of the "Results" tab. Please note that using this button will always clear all "Result" records regardless of the currently displayed list view!
5.3. Error when assigning emails
Errors in the assignment of incoming emails to Salesforce data records are displayed in the "Result" object provided, as are errors during import. If an incoming email cannot be assigned, the respective cause can be determined here.
The error messages issued as part of "Mapping Errors" can be configured within the "Mapping" record that triggered the mapping attempt.
In some cases, the system also allows an error email to be sent to the email address stored in the configuration ("Error Email Address" in the configuration object, see point 2.4 Configuration).
5.4. Error when creating target objects
If a "Target Object" record is created, but a field marked as "required" in Salesforce is not created as "Field Configuration" in the "Field Configuration", the corresponding record cannot be created.
The following error message appears:
 X
X
5.5. Error during import of old emails
When importing older emails that have subsequently been moved to a mailbox, these emails may no longer be included in the processing by default. For performance reasons, in.bounz always processes emails chronologically (in descending order by date), which is why emails that are imported later are not always processed.
For mailboxes containing fewer than 10 emails, every email is processed each time a new import is performed. This ensures that in.bounz processes mailboxes containing manually moved emails without any gaps. Therefore, if you need to import and process older emails, we recommend creating a separate mailbox and importing the desired emails in batches of 10 to ensure they are processed correctly.
6. Glossar
App Launcher
The App Launcher allows users to switch between different applications. The App Launcher displays tiles associated with available Salesforce apps, connected apps (third-party apps), and the user's local apps.
App Password
An app password is a 16-digit security code that apps or devices can use to access your Google account. App passwords can only be used for accounts that have two-step confirmation enabled.
Permission Sets
A collection of permissions to extend the access rights of users granted at profile level.
Formular Field
A field that cannot be edited.
IMAP
IMAP is the abbreviation of Internet Message Access Protocol and enables online access to an email mailbox.